
Install & Configure EDB Enterprise Monitoring for Postgres
About this post
EDB has many tools along with their PostgreSQL Advanced Server. The tool which is designed to monitor and manage PostgreSQL servers’ is called, Postgres Enterprise Manager (PEM). PEM assist database administrators, system architects, and performance analysts to administer and tune PostgreSQL and Advanced Server databases.
This blog post explains how to install and configure PEM on CentOS 8. The PEM Server version I’m using here is, 7.16, the latest version at this writing.
PEM Architecture
Please use the link under references to see more details about the PEM architecture. However, for the purpose of completenes of this post, I will explain the PEM architecture briefly.
PEM consists of multiple components which are listed below;
-
PEM Server - The PEM Server is used as the data repository for monitoring data which is backed by postgresql instance. PEM Agents and clients connect to the PEM Server via Web UI.
-
PEM Agent - PEM Agent reports the statistics to the PEM Server. PEM Agent needs to be installed on each postgresql host which you wish to monitor. The PEM Agent is also installed in the PEM Server host by default. This Agent is called, PEM Agent on PEM Host. You can use this PEM Agent to monitor PostgreSQL instances remorely as well but you will not get some matrics specially related to the OS. That is the reason, you would need to install PEM Agents locally with DB Servers.
-
PEM Web Client - The PEM Web interface allows you to manage and monitor postgres servers. This is Appache Web Server.
-
SQL profiler - SQL Porfiler is a Postgres server plugin to record the monitoring data and query plans to be analysed by the SQL Profiler tool in PEM.
Below is the architure of the PEM monitoring which I explain in this post.
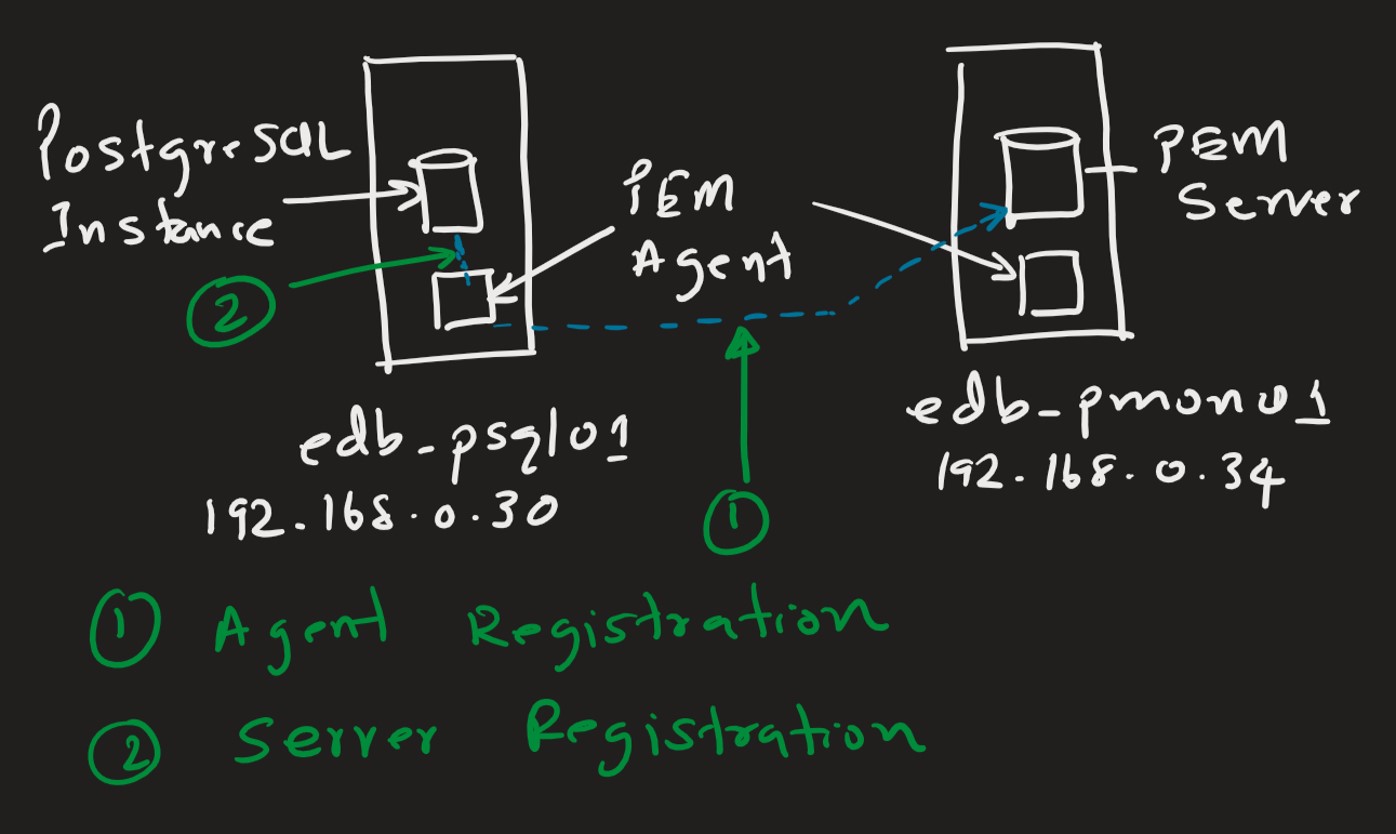
- edb-psql01 - is the PostgreSQL DB instance with EDB Advanced Server 12
- edb-pmon01 - is the monitoring server with PostgreSQL 12 and EDB PEM components
- (1) represents the activity of agent registration with the backend PEM Server
- (2) represennts the activity of agent server registration with DB server which you need to monitor
Installation
Installation is quite straigh forward. Please see the steps below:
Preparing the monitoring server (edb-pmon01/192.168.0.34)
-
You need to install PEM backend DB server on edb-pmon01 node. You can either use PostgreSQL or EDB Advanced Server for this. In my case, I just installed PostgreSQL 12 as the backend server.
- Install two postgres additional modules. Depending on the postgreSQL version, the modules versions is also changes.
$ sudo yum install postgresql12-contrib $ sudo yum install sslutils_12 - If this server has a firewall, you could either disable or add firewall rules. Just for the simplisity, I just stopped/disabled the firewall on the monitoring server.
$ sudo systemctl stop firewalld $ sudo systemctl disable firewalld - Install epel-release package
$ sudo yum -y install https://dl.fedoraproject.org/pub/epel/epel-release-latest-8.noarch.rpm - Install and configure edb.repo file
You need to have credentials to the enterprisedb site in order to get access to their repos.
$ sudo yum -y install https://yum.enterprisedb.com/edb-repo-rpms/edb-repo-latest.noarch.rpm $ sudo sed -i "s@<username>:<password>@USERNAME:PASSWORD@" /etc/yum.repos.d/edb.repoNote: Please replace your USERNAME and PASSWORD with the actual values.
Preparing the server to be monitored
You need to install the PEM Agent on each server which you want to monitor. You can follow the steps below to install the PEM Agent.
- Install epel-release package
sudo yum -y install https://dl.fedoraproject.org/pub/epel/epel-release-latest-8.noarch.rpm - Install and Configure the edb.repo File
sudo yum -y install https://yum.enterprisedb.com/edb-repo-rpms/edb-repo-latest.noarch.rpm - Specify the user name and password
sed -i "s@<username>:<password>@USERNAME:PASSWORD@" /etc/yum.repos.d/edb.repo - Install the PEM Agent
sudo dnf install edb-pem-agent
Configuration
- Configuring PEM Server In this scenarion, I’m using PostgreSQL 12 as the backend server. So it requires two extensions (sslutils, hstore). So make sure it is installed before proceeding.
To configure PEM Server, use the below command and it will prompt you to enter parameter values. See below screenshot for the PEM Server configuration output.
sudo /usr/edb/pem/bin/configure-pem-server.sh

Note: If you do not run the above comand as sudo, you will get some permission errors.
Once the configuration is succefull, you can access the PEM Server Web UI using the below url.
https://<ip_address_of_PEM_server>:8443/pem
Make sure firewall rules are added or firewall is completely disabled on the PEM Server.
- Registering the PEM Agent to the backend PEM Server Before you register the agent, you need to change the listen_address attribute in postgresql.conf to ‘*’ then only it can access the PEM Server from edb-psql01. This change requires a service reboot. Without this change, the agent registration will fail.
Use the below command to register PEM agent on PostgreSQL DB host which you wish to monitor.
sudo PGPASSWORD='pwd' /usr/edb/pem/agent/bin/pemworker --register-agent --enable-heartbeat-connection
Note: It is always safe to run the command above in non-root user by resolving permission issues. There are many other options available for pemworker and you can get them using the help option as stated below:
/usr/edb/pem/agent/bin/pemworker --help
- Registering the server with PEM Agent
Run the below command to register the agent with the postgresql instance which are being monitored.
sudo PGPASSWORD='pwd' /usr/edb/pem/agent/bin/pemworker --register-serverNote that the PASSSWORD is the one used to connect to the PEM Server. It will be prompted to enter the user name. See below screenshot for the output from the server registration.

Conclusion
Setting up enterprise monitoring for postgreSQL is not that complex, though it needs few components to be configured and registered. Once the monitoring server is setup, it is quite simple to add a server(s) to the monitoring with two steps process, 1. pem agent register 2. pem server register as explained above. You can do this via the Web UI as well. The troubleshooting section below states few common troubleshooting scenarios you probably need during this excersice. The PEM installation guide given under References section gives you pretty good instructions for many versions as well as multiple platforms. I’d recommend you to follow that guide from the start.
Troubleshooting
- Permission issues are very common when you run all these commands as a non-root user. So case by case you need to troubleshoot and fix them.
- Check the error logs at anytime if you want to dig in more.
- /var/log/secure - used to track all security related messages including authorization failures on CentOS
- /var/log/messages - CentOS system log
- /var/log/edb/pgagent12/ - location for the pem agent logs
- /var/log/edb/as12/ - EDB Advanced Server 12 error log
note: PEM Server/Agent, EDB Advanced Server logs location would be vary depending on how you configured them.
- I had initially created a user named, pem_admin, even before installing the PEM Server but later discovered pem_amdin is internal to the PEM Server. However, at that time I already configured the PEM server by running, /usr/edb/pem/bin/configure-pem-server.sh with the user pem_admin. Since pem_admin is internal role with no login permission, I needed to change it to some other user by simply re-running the script, /usr/edb/pem/bin/configure-pem-server.sh. But it did not prompt me to enter a new user rather it was using the same user, pem_admin which I configured at previous time.
So with some digging, I found this file, /usr/edb/pem/share/.install-config which actually stored the config values at configuration. See below for the contents of the file.
[susanthab@edb-pmon01 ~]$ cat /usr/edb/pem/share/.install-config
PEM_INSTALLATION_TYPE=1
PG_INSTALL_PATH=/usr/pgsql-12
SUPERUSER=pem_admin
HOST=127.0.0.1
PORT=5432
AGENT_CERTIFICATE_PATH=/root/.pem/
PEM_PYTHON=python3
CIDR_ADDR=192.168.0.0/24
DB_UNIT_FILE=postgresql-12
What I did was, I just removed the user (pem_admin) from above file and then re-run the /usr/edb/pem/bin/configure-pem-server.sh which enable for me to enter new user. See below screenshot: Note: You also need to add a rule to pg_hba.conf with the new user on PEM Server, otherwise you will get authentication failure.
References
About the post header picture: It was taken during the Fall Color Trip 2020 at Independence Pass, Colorado on Sep 29th.