How to setup AWS Application Load Balancer for Couchbase
2018, Apr 04
Introduction
You might be wondering why we really need a load balancer for Couchbase. Well, that is a reasonable question to ask and I thought of clarifying this matter before we move further into the topic.
The objective here is NOT to use a load balancer to perform its noble task which is to distribute application traffic. The load balancer uses here as a tool to help manage connection string of the Couchbase. At the end of this article you will understand how to manage the Couchbase connection string in fully automated fashion.
How client applications work with Couchbase
Let's go through a brief description on how client applications work with Couchbase server.
Any application that connects to Couchbase has a connection string which consists of one or more cluster nodes. Since Couchbase is a distributed database, a typical production deployment of Couchbase has multiple nodes in a cluster. As a result you need to provide one or more such cluster node IP addresses or host names to the connection string. It is not required to provide all the cluster nodes to the connection string, however it is often best practice to specify at least two host names because if the application could not connect to one, then it will try the next node.
After establishing the connection to Couchbase, the smart client receives a cluster map from the Couchbase. In nutshell, cluster map has the information about Couchbase nodes, data distribution of vBuckets, etc. From that point, smart client knows where to read/write data precisely. This process is called client bootstrap.
However, overtime, Couchbase cluster may shrinks or grows depending on the application load. If that happens, the cluster nodes will be changed. So then what will happen to the connection string you created at initial cluster setup? Those information is not fully accurate now? Of course you could update the connection string manually but in automated environment any manual work would be considered a cheap thing.
To resolve this or let the client application knows the latest cluster nodes with no human intervention, you could use AWS application load balancer.
Typical role of application load balancer
AWS Application Load Balancer-ALB, is one of the new services of their service arsenal. Load balancer typically used as a single point of contact for clients and it distributes incoming application traffic across multiple targets, such as EC2 instances. Well, as we know how applications connecting to Couchbase cluster, we understand the typical use of the load balancer will not exactly fits in this context to distribute the database traffic because to distribute the database traffic, the load balancer knows nothing about the Couchbase.
Use of Application Load Balancer in Couchbase
The following diagram illustrates the basic architecture of ALB used in Couchbase.
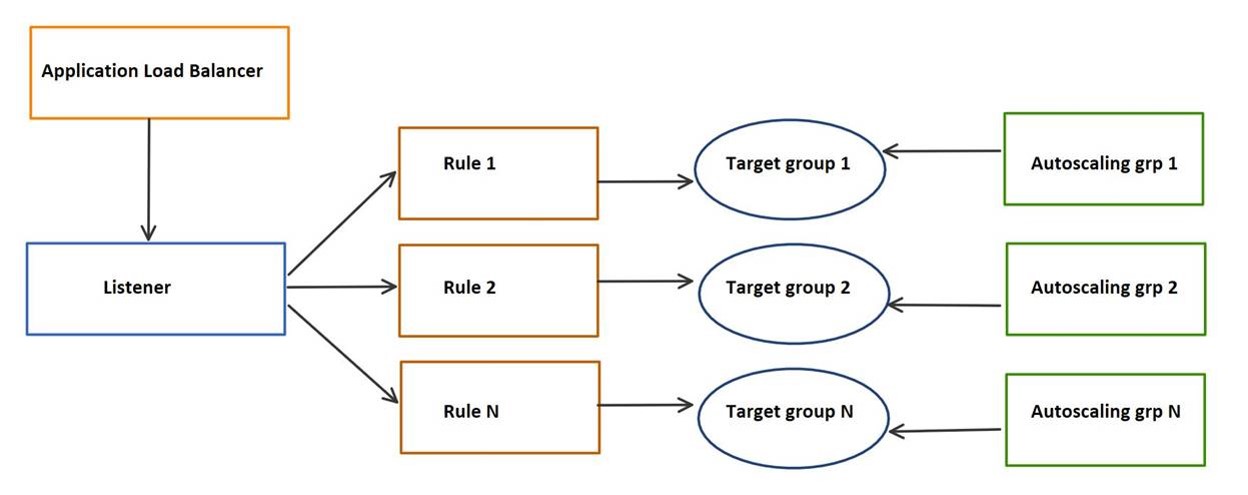
Create ALB for Couchbase cluster
It is now common that Couchbase cluster deploys on AWS autoscaling groups which provides lot of benefits and automation friendly environment. Let's go through step by step process on how to create an ALB for Couchbase.
Assume you already have a Couchbase cluster deployed on AWS autoscaling group.
1. Create an ALB
I'm not going to repeat the steps in AWS docs here. Please follow the link given below to start creating the ALB and I will highlight the things we need to know for Couchbase context while creating it.
In Basic Configuration there are two schemes you can select as seen below;

It's your choice to expose Couchbase admin UI to internet or internal. Depending on that select the Scheme. Let's assume we selected "internet-facing" scheme.
In Availability zones, select your VPC and the subnets that you need to place the ALB. For internet facing scheme, you need to place your ALB in subnets where you have internet access (Internet Gateway). You need to select more than one subnets for high-availability purposes.
2. Create security group
Follow the steps as it is in the page. Recommended rule are given in below link;
Please note, since our ALB is internet-facing, the Inbound Source of the security group should be "0.0.0.0/0".
3. Create target group
In Configure Routing section, please make sure you change the highlighted section as below;
4. Register target
Remember that our Couchbase cluster runs on AWS autoscaling group. So that we need to register autoscaling group as one of the targets for ALB. In this section you could register individual instances too but that is not what we need here. So just skip this section for now and click on Review.
Review all the settings and if accurate click on Create.
At this point, you have your ALB created. However still your target group is empty because we have not yet registered any EC2 instances to the target group. We will do that in the next step.
5. Register autoscaling group as the target
Select the autoscaling group which has Couchbase server deployed.
On Details tab, select Edit.
Select the target group which you have just created in above. See screenshot below;

Then click on Save.
6. Verify target group
As soon as you finished with step #5, please switch over to target groups under Load Balancing and select the target group. e.x: test-tg-couchb
On Targets tab you can now notice the Couchbase cluster EC2 instances are registered. See below screenshot.
Since the Couchbase cluster as single instance (in this example), it shows just one instance. In the same section you also can see health check is passed which means ALB is able to communicate with the Couchbase server.

7. Access Couchbase server admin UI
Remember that we created internet-facing ALB so that we can now access the admin UI using the ALB DNS name.

Just copy and paste this URL into the browser to access the Couchbase UI. Make sure the security group you created for the ALB is accepting traffic from internet.
See below that the security group is open to internet traffic.
8. Enable sticky session
If you are having trouble accessing the Web UI then do one more change in the target group to enable the sticky session. This is specially required when you have multiple nodes in the Couchbase cluster.
Select the desired target group. Under Attributes on Details tab, Edit attributes to enable the sticky sessions as shown below;
Then try the Couchbase Web UI once again.
Setting up Route 53
Earlier we just tried Amazon internally generated URL of the load balancer to access the Couchbase Web UI. Most often when we design things we need to do it neatly. It is always better to have customized URL for each Couchbase cluster so that it is easier to remember as well. You could achieve this by creating a public or private Route53 entry and then point that to the ALB you just created above. You can refer the link below on how to setup Route53 for the load balancer.
How many load balancers you need?
Well, the load balancer has a cost associated with it. Whatever the cloud design you come up with should also need to consider the cost aspect of it too. Having a load balancer for each Couchbase cluster is definitely expensive but thanks to the new ALB, now you could use one ALB to connect to multiple Couchbase clusters using path-based or host-based routing strategy. Below section describes the routing strategy and how to configure it.
Routing strategy
In Amazon web console, select the ALB that you created above. Select the Listeners tab of the load balancer's properties. You could see something like below;
Which means, the load balancer we created has just one listener. Notice the Rules section. Just click on View/edit rules. You could see the Rule Editor like below;
Look at that, we can define rules for ALB. Even though we did not create any explicit rules, there is a default rule created and it is associated to the target group (test-tg-couchb) we just created.
In here, you can add/modify/delete rules. Let's assume you have another target group which is pointing to a different Couchbase cluster that runs on another autoscaling group. Let's call that target group as test-tg-couchb2. Assume that you also created a Route53 entry which pointing to the same ALB that we created above. Let's call that Route 53 entry as couchbase.couchb2.com.
By utilizing a listener rules as shown above, you can tell the listener to divert all the incoming calls to couchbase.couchb2.com to the target group, test-tg-couchb2. Refer the screenshot below;

Let's backup a little bit and try to understand what we just did.
We just added a new listener rule for the same ALB. The new rule is host-based one and it diverts all the incoming traffic to couchbase.couchb2.com Route 53 DNS name to the new target group called, test-tg-couchb2 which essentially pointing to a different Couchbase cluster runs on autoscaling group. That is amazing right.
Refer the links below for more details about Listener Rules.
Couchbase connection string
Now you have setup stable Route 53 DNS name for your Couchbase cluster. The next step is to use that DNS name to connect to your Couchbase cluster just to be clear, we are not going to use the DNS directly to bootstrap the client SDK. We have already seen how it can be used to connect to the Couchbase admin UI.
Below mentioned is the python code snippet that you could use to get latest Couchbase nodes and then use those nodes to build the connection string as you would do it normally. Now you do not have to worry about adding or removing nodes to your Couchbase cluster because there will be no change in the connection string. Everything will be taken care by the ALB.
url='http://couchbase-couchb2.com/pools/nodes'
u = 'admin'
p = 'Ch@ng3m3!'
response = requests.get(url, auth=(u, p))
nodes = json.loads(response.text)['nodes']
hosts=""
for n in nodes:
hosts = hosts + ',' + n['hostname']
hosts = hosts.lstrip(',')
print(hosts)
couchbase://hosts
Summary
In this article we just went through how to use Amazon Application Load Balancer to manage connection string of the Couchbase cluster. We also learnt, how to use single ALB to connect to multiple Couchbase clusters to reduce the cost. While there are many solutions available to handle connection string, you would find this solution as fully automated and easy implementation. Hope you learnt something new.
However Couchbase recommended method is to use DNS SRV record which is described below;
While the DNS SRV method is efficient but it has some management overhead because you need to do some extra programming to manage the DNS SRV records as you add / remove nodes in the cluster. I still believe Couchbase has no developer friendly method to manage connection string in Cloud environment. In my opinion this is something Couchbase needs to implement very soon rather than later.