How To Create a MongoDB Replica Set
2016, Aug 04
Recently I did setup a MongoDB replica set in a VM hosted in AWS cloud environment. Since I'm totally into SQL Server and Windows, setting up MongoDB replica set was quite challenging and at the same time it was interesting. The biggest challenge was to use the terminal for scripting work. It looks to me, writing commands in terminal was bit cumbersome. Writing some commands in mongo shell with JSON format adds more complexity to the work. I'm not a fan of JSON format. JSON use to be the developer friendly format and not definitely a friend of DBAs.
The concept of MongoDB replica set is quite interesting. You can use replica set configuration to achieve both High Availability (HA) and Disaster Recovery (DR) objectives. It has automatic failover feature too. In replica set, one node is capable to perform write and read operations and it is called a primary node. The secondary nodes can be used for multiple purposes such as DR, analytics, reads, backups, etc. There is a third type of node known as Arbiter. This node is optional and it is used as a tie breaker in election process. Election process is carried out in events which needs to select a new primary. Arbiter is just to participate for the election and it does not hold any data.
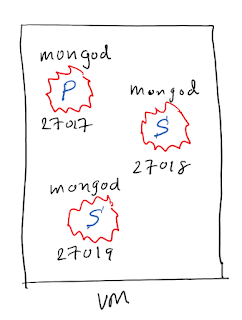
Replica set architecture
Replica set has many different architectures depending on the business need. The replica set I created has three nodes, 1 primary and 2 secondaries. Node is also knows as a member. The simplicity of the replica set architecture in MongoDB is, it can be created in a single machine as well. In the below example, I created all three members in the same VM. Each node would reside in separate VMs in typical production deployment. Below diagram illustrate three members replica set in a single VM.
Steps
Below are the steps that I carried out to setup the replica set;
Node Provisioning
1. Spin up a VM in AWS cloud. This is quite simple and its free. You can sign up for 1 year free subscription in AWS so that you can mock around it. Use this URL to sign up to AWS cloud. https://aws.amazon.com/
Connect to the VM
2. Use the public IP to connect to the VM you just created in step #1. You can SSH to the node using below command in Terminal.
> sudo ssh -i "aws/test.pem" ubuntu@ip
The test.pem file contains the private key that is used to authenticate into the cloud VM. You can create this key pair in AWS console and then download the file. In my experiment, I placed the pem file in folder called, aws.
Furthermore, you need to check the pem file permissions. The pem file needs be given the minimum permission (read-only) in order to authenticate with the cloud VM. Follow the below mentioned commands to manage the pem file permissions.
> ls -l test.pem # check the permission of the file.
> chmod 400 test.pem # set the file permission to read only.
Install MongoDB
4. Since this is a brand new VM, I had to install the MongoDB using the below command.
> sudo apt-get install -y mongodb
Please note the command given in mongodb site does not work. (apt-get install -y mongodb-org)
Configure Replica Set
3. Create three separate folders to maintain replica set files for each node.
> mkdir -p /srv/mongodb/rs0-0 /srv/mongodb/rs0-1 /srv/mongodb/rs0-2 /srv/mongodb/rs0-3
rs0-0, rs0-1, and rs0-2 are the folder names. You can use -p switch with the above command to create these three folders in a single statement. Its awesome, huh!
4. Create three separate mongod instances.
Please note, each mongod service/process has given unique port numbers. These port numbers are later use to connect to each mongod instance. Functional point of view, these mongod instances are somewhat analogous to SQL Server instances because it represent individual server instance which can hold databases. In this example, all three server instances are to be run on a single VM. However in a typical production environment these instances run in separate VMs.
You can also notice --dbpath parameter is given the specific folder name for the each instance. These are the folders that we created in step #3. Additionally it has the replica set name, rs0 which is the same in all three instances because these three instance are for one replica set. The replica set structure can be considered as a cluster environment in SQL Server.
Oplog is the transaction log in MongoDB. So you can specify the oplog size when creating the mongod instances. Creating replica set has lot more parameters other than the ones mentioned above. (Please refer the links given in references section for more detail)
Connecting to mongod instance
5. Once the step #4 complete successfully, you now have three member MongoDB replica set. Next thing is to connect to an instance. For example, we want to connect to 27107 instance.
> mongo --port 27017
Then you will get a prompt specific to the instance you connected. With the prompt itself you can identify whether it is Primary or Secondary. Something like below;
rs0: PRIMARY>
But as of now, we just created mongod processes. We have not yet completed the replica set creation.
Add members to the Replica Set
6. After connecting to the 27017 mongod instance, you can run the below command in mongo shell to add one member to the Replica set.
The preceding JSON document has the minimum information required to add a member to the replica set. You can specify all the members to the same document in members array. What I'm going to do is, to create one member and then add the other two members later.
Below JSON document shows how you add all members at once with some additional parameters.
I had some issues when copy and paste the above JSON style document to the mongo shell. This is the reason I said typing these scripts in mongo shell is very challenging, at least for me. Alternatively you can create a file with above document and then execute the file. Probably that is the easy route to take.
7. Initiate the Replica set
> rs.initiate( rsconf )
This will initiate the Replica set and primary node will be created.
8. Add other two members to the replica set, rs0.
> rs.add("localhost:27018")
> rs.add("localhost:27019")
Note that the port numbers are different for each member.
Now we've completed of adding all three members to the replica set, rs0. You can notice the mongo shell that is connected, indicates as PRIMARY. At this point, the replica set we created is up and running.
Monitoring
9. Below are some useful commands that you can use to manage the Replica set.
Testing
10. Connect to the primary node and insert a record.
> db.people.insert({'name':'Andrew'})
> db.people.find()
You can see the new record exists in primary. Now connect to a secondary node and issue the following command. If your querying the secondary at very first time, then by default you can't view records. You need to run rs.slaveOk() to make it readable.
> db.people.find()
References
https://docs.mongodb.com/manual/tutorial/deploy-replica-set-for-testing/
Hope this helps for a beginner who is willing to learn MongoDB.
Cheers.
The concept of MongoDB replica set is quite interesting. You can use replica set configuration to achieve both High Availability (HA) and Disaster Recovery (DR) objectives. It has automatic failover feature too. In replica set, one node is capable to perform write and read operations and it is called a primary node. The secondary nodes can be used for multiple purposes such as DR, analytics, reads, backups, etc. There is a third type of node known as Arbiter. This node is optional and it is used as a tie breaker in election process. Election process is carried out in events which needs to select a new primary. Arbiter is just to participate for the election and it does not hold any data.
Replica set architecture
Replica set has many different architectures depending on the business need. The replica set I created has three nodes, 1 primary and 2 secondaries. Node is also knows as a member. The simplicity of the replica set architecture in MongoDB is, it can be created in a single machine as well. In the below example, I created all three members in the same VM. Each node would reside in separate VMs in typical production deployment. Below diagram illustrate three members replica set in a single VM.

Steps
Below are the steps that I carried out to setup the replica set;
Node Provisioning
1. Spin up a VM in AWS cloud. This is quite simple and its free. You can sign up for 1 year free subscription in AWS so that you can mock around it. Use this URL to sign up to AWS cloud. https://aws.amazon.com/
Connect to the VM
2. Use the public IP to connect to the VM you just created in step #1. You can SSH to the node using below command in Terminal.
> sudo ssh -i "aws/test.pem" ubuntu@ip
The test.pem file contains the private key that is used to authenticate into the cloud VM. You can create this key pair in AWS console and then download the file. In my experiment, I placed the pem file in folder called, aws.
Furthermore, you need to check the pem file permissions. The pem file needs be given the minimum permission (read-only) in order to authenticate with the cloud VM. Follow the below mentioned commands to manage the pem file permissions.
> ls -l test.pem # check the permission of the file.
> chmod 400 test.pem # set the file permission to read only.
Install MongoDB
4. Since this is a brand new VM, I had to install the MongoDB using the below command.
> sudo apt-get install -y mongodb
Please note the command given in mongodb site does not work. (apt-get install -y mongodb-org)
Configure Replica Set
3. Create three separate folders to maintain replica set files for each node.
> mkdir -p /srv/mongodb/rs0-0 /srv/mongodb/rs0-1 /srv/mongodb/rs0-2 /srv/mongodb/rs0-3
rs0-0, rs0-1, and rs0-2 are the folder names. You can use -p switch with the above command to create these three folders in a single statement. Its awesome, huh!
4. Create three separate mongod instances.
> sudo mongod --port 27017 --dbpath /srv/mongodb/rs0-0 --replSet rs0 --smallfiles --oplogSize 128
> sudo mongod --port 27018 --dbpath /srv/mongodb/rs0-1 --replSet rs0 --smallfiles --oplogSize 128
> sudo mongod --port 27019 --dbpath /srv/mongodb/rs0-2 --replSet rs0 --smallfiles --oplogSize 128
> sudo mongod --port 27018 --dbpath /srv/mongodb/rs0-1 --replSet rs0 --smallfiles --oplogSize 128
> sudo mongod --port 27019 --dbpath /srv/mongodb/rs0-2 --replSet rs0 --smallfiles --oplogSize 128
Please note, each mongod service/process has given unique port numbers. These port numbers are later use to connect to each mongod instance. Functional point of view, these mongod instances are somewhat analogous to SQL Server instances because it represent individual server instance which can hold databases. In this example, all three server instances are to be run on a single VM. However in a typical production environment these instances run in separate VMs.
You can also notice --dbpath parameter is given the specific folder name for the each instance. These are the folders that we created in step #3. Additionally it has the replica set name, rs0 which is the same in all three instances because these three instance are for one replica set. The replica set structure can be considered as a cluster environment in SQL Server.
Oplog is the transaction log in MongoDB. So you can specify the oplog size when creating the mongod instances. Creating replica set has lot more parameters other than the ones mentioned above. (Please refer the links given in references section for more detail)
Connecting to mongod instance
5. Once the step #4 complete successfully, you now have three member MongoDB replica set. Next thing is to connect to an instance. For example, we want to connect to 27107 instance.
> mongo --port 27017
Then you will get a prompt specific to the instance you connected. With the prompt itself you can identify whether it is Primary or Secondary. Something like below;
rs0: PRIMARY>
But as of now, we just created mongod processes. We have not yet completed the replica set creation.
Add members to the Replica Set
6. After connecting to the 27017 mongod instance, you can run the below command in mongo shell to add one member to the Replica set.
> rsconf = {
_id: "rs0",
members: [
{
_id: 0,
host: "localhost:27017"
}
]
}
_id: "rs0",
members: [
{
_id: 0,
host: "localhost:27017"
}
]
}
The preceding JSON document has the minimum information required to add a member to the replica set. You can specify all the members to the same document in members array. What I'm going to do is, to create one member and then add the other two members later.
Below JSON document shows how you add all members at once with some additional parameters.
> conf = {
_id:"mySet",
members:[
{_id:0,hots:"A",priority:3},
{_id:1,hots:"B",priority:2},
{_id:2,hots:"C"},
{_id:3,hots:"D",hidden:true},
{_id:4,hots:"E",hidden:true,slaveDelay:3600},
]
}
_id:"mySet",
members:[
{_id:0,hots:"A",priority:3},
{_id:1,hots:"B",priority:2},
{_id:2,hots:"C"},
{_id:3,hots:"D",hidden:true},
{_id:4,hots:"E",hidden:true,slaveDelay:3600},
]
}
I had some issues when copy and paste the above JSON style document to the mongo shell. This is the reason I said typing these scripts in mongo shell is very challenging, at least for me. Alternatively you can create a file with above document and then execute the file. Probably that is the easy route to take.
7. Initiate the Replica set
> rs.initiate( rsconf )
This will initiate the Replica set and primary node will be created.
8. Add other two members to the replica set, rs0.
> rs.add("localhost:27018")
> rs.add("localhost:27019")
Note that the port numbers are different for each member.
Now we've completed of adding all three members to the replica set, rs0. You can notice the mongo shell that is connected, indicates as PRIMARY. At this point, the replica set we created is up and running.
Monitoring
9. Below are some useful commands that you can use to manage the Replica set.
| rs.help() | Returns a basic help for all of the replication related shell functions |
| rs.conf() | Returns a document that contains the current replica set configuration |
| rs.status() | Returns a document with current status information of the replica set |
| rs.slaveOk() | Allows the current connection to allow read operations to run on secondary members |
Testing
10. Connect to the primary node and insert a record.
> db.people.insert({'name':'Andrew'})
> db.people.find()
You can see the new record exists in primary. Now connect to a secondary node and issue the following command. If your querying the secondary at very first time, then by default you can't view records. You need to run rs.slaveOk() to make it readable.
> db.people.find()
References
https://docs.mongodb.com/manual/tutorial/deploy-replica-set-for-testing/
Hope this helps for a beginner who is willing to learn MongoDB.
Cheers.